Showing posts with label gift ideas. Show all posts

Tuesday, November 26, 2013

Kastyns Birthday gift

I think I overdid it with the adorable.  My daughters showed me a picture of an outfit like this and I went to town on it.
I made her an outfit to wear to the party and a bib to wear when she eats cake.  Then a hat to wear because its cold.
Her momma said she already has a pair of black tights and black shoes.

Thursday, August 30, 2012

Baby gift

I made up these headbands and barrettes for a baby gift for my husbands niece.  She had a baby girl about 2 or 3 months ago and I thought I'd send a little gift.  I hope she likes them.

Wednesday, November 16, 2011

Buy local or at least hand made this year

This year if you are able and need a gift I hope that you will support local and or cottage industry type folks where ever possible. Most of the time folks make very nice items for close to the same price you could buy it in the store. Many times they can make custom items for you as well.

In the last few days I have sold soap, lotion, waterless hand cleaner and now today I got an order to sew three feed sack bags using the customers feed sacks.

These sales encourage me that people value hand crafted products made in America.

What about you? Do you buy hand made and hand crafted items for gifts?

Friday, November 11, 2011

American gift ideas

As the holidays approach, the giant Asian factories are kicking into
high gear to provide Americans with monstrous piles of cheaply produced goods --
merchandise that has been produced at the expense of American labor.

This year will be different. This year Americans will give the gift of genuine concern for other Americans. There is no longer an excuse that, at gift giving time,
nothing can be found that is produced by American hands.

Yes there is! It's time to think outside the box, people. Who says a gift needs to fit in a shirt box, wrapped in Chinese produced wrapping paper?

1.Everyone -- yes EVERYONE gets their hair cut. How about gift certificates from your local American hair salon or barber?

2. Gym membership? It's appropriate for all ages who are thinking about some health improvement.

3. Who wouldn't appreciate getting their car detailed? Small, American owned detail shops and car washes would love to sell you a gift certificate or a book of gift certificates.

4. Are you one of those extravagant givers who think nothing of plunking down the Benjamin’s on a Chinese made flat-screen? Perhaps that grateful gift receiver would like his driveway sealed, or lawn mowed for the summer, or driveway plowed all
winter, or games at the local golf course.

5.There are a bazillion owner-run restaurants -- all offering gift certificates. And, if your intended isn't the fancy eatery sort, what about a half dozen breakfasts at the local breakfast joint.

Remember,folks this isn't about big National chains -- this is about supporting your hometown Americans with their financial lives on the line to keep their doors open.

6. How many people couldn't use an oil change for their car, truck, or motorcycle, done at a shop run by the American working guy?

7.Thinking about a heart felt gift for mom? Mom would LOVE the services of
a local cleaning lady for a day.

8. My computer could use a tune-up, and I KNOW I can find some young guy who is struggling to get his repair business up and running.


OK, you were looking for something more personal. Local crafts people spin their own wool and knit them into scarves. They make jewelry, and pottery and beautiful wooden boxes.

9. Plan your holiday outings at local, owner operated restaurants and leave your server a nice tip.

10.And, how about going out to see a play or ballet at your hometown theatre. Musicians need love too, so find a venue showcasing local bands.

Honestly, people, do you REALLY need to buy another ten thousand Chinese lights for the house? When you buy a five dollar string of light, about fifty cents stays in the community. If you have those kinds of bucks
to burn, leave the mailman, trash guy or babysitter a nice BIG tip.

You see, gift giving is no longer about draining American pockets so
that China can build another glittering city.

Gift giving is now about caring about US, encouraging American small businesses to keep plugging away to follow their dreams. And, when we care about other Americans, we care about our communities, and the benefits come back to us in ways
we couldn't imagine.

Wednesday, November 2, 2011

Homegrown handmade cutting board


After seeing a big, round hunk of wood used as a centerpiece at a friend’s wedding (see below, left), I wanted to give this project a try. Hank and I have scores and scores of downed trees around the farm, everything from pine and walnut to hackberry and Osage orange. I asked Hank to saw off some inch-thick pieces from an old walnut tree so I could sand them down and give them away as Christmas gifts.

After sorting through my cache of wood blocks, I got to work. I used a chisel to carefully peel away the bark around the edges of the wood round; I wanted to preserve the beautiful striations in the wood, rather than buffing them all out with a power sander. Then I got to work sanding. I used a belt sander first with 80-grit paper to remove all the chainsaw gashes. I learned that you really need to be careful with a belt sander, but at the same time, give it enough pressure to even out the surface. It doesn’t take long for things to go from bad to worse with this tool. I found that I would gash the wood if I tried to even out a mark here or there. Better to just grind down the sides of a gash with even pressure than to try and smooth it out head on. (If you’ve ever used a sander, you’ll know what I mean.) Hank was there to help me along the way and after a while, I became halfway proficient with it.

Next, I switched to a palm sander and used 100 grit, followed by 150 grit, and finally 400 to give it a nice smooth finish. I applied food-safe butcher block wax, sanding briefly with 400 between coats, until a nice glossy finish was achieved, without being sticky.

At top right you can see one really interestingly shaped piece I finished and used for a recipe shot for my “Heirloom Kitchen” column in Heirloom Gardener (www.rareseeds.com).
Next, I’m finishing some smaller rounds and turning them into coasters! Nature provides some of the best gifts, and with a little patience and effort, you can create something truly unique and beautiful for your friends and family. No mall (or Internet even) required!


source: http://www.motherearthnews.com/common-fare/homegrown-homemade-cutting-board.aspx

Tuesday, November 1, 2011

Flower bookmarkers


For starters, choose a fabric and cut it into a rectangle. Cut it as long as you want your bookmark and twice as wide as you want it to end up being, plus a little extra to allow for the seam. Also, cut a piece of stiff fusible interfacing the size you want your bookmark.

Next, fold the fabric in half lengthwise, with right sides together. Sew along one short side and the open long side. Leave one short end open.

Step 3 is to flip the fabric right side out and insert that piece of interfacing inside. Tuck the raw edges of the open short end inside and sew that end closed. You can also top-stitch along all 4 sides for a more finished look.

Now, on to the fabric flower. Cut a long strip of fabric @1" wide. With a hot glue gun handy, roll and wrap your fabric so the printed side is always showing. Hot glue as you go to hold everything in place. Glue onto the top end of your bookmark.

I love the end result. See how that purty flower peeks out from the top of your book?

source: http://quiverfullofblessings.com/2011/10/03/fabric-flower-bookmarks/

Button bookmarks


All it takes are a few simple steps:

1. Cut out a fabric circle approximately twice the diameter of the button cover.

2. Place the fabric printed side facing down in the button-cover mold.

3. Push the front half of the button rounded side down on top of the fabric.

4. Tuck the edges of the fabric into the center, and then press the button back into it until it is firmly encased.

5. Thread the paperclip through the shank of the button until the button rests at the top rounded edge.

6. Hot glue in place. I dabbed hot glue around the shank area and also where the edges of the button back rest on the paperclip.

Source: http://quiverfullofblessings.com/category/craftdiy-ideas/

Laundry Mousse


One of my very first posts as a blogger was a recipe for homemade laundry detergent. I still love it and recommend it, but I came across an intriguing recipe for homemade laundry mousse a couple of weeks ago that I wanted to try. Actually, I just used up the last of my liquid, so it was perfect timing for me to try making this kind. The ingredients are all the same, it’s just putting them together in a slightly different way.


The texture of this recipe is kind of creamy, almost like a paste. It actually reminds me of whipped butter in appearance and has a fresh smell that I love.

Intrigued as to how I made this? Here’s the recipe that I followed, taken from the Raising 4 Princesses blog:

6 cups water

2 bars Fels Naptha Soap

2 cups Borax

2 cups Arm & Hammer Washing Soda


I get all of my ingredients at an Amish Dry Goods store that is local, but you can probably find these at WalMart or your grocery store in the laundry aisle.Washing soda is slightly different than baking soda, so just be aware of that before you start. The first step is to take a large saucepan and heat up 6 cups of water in it. In the meantime, grate the 2 bars of Fels Naptha soap and pour them in the water. Heat to almost boiling until your soap flakes are dissolved. Add the Borax and washing soda and stir for about 3 minutes.


Remove from heat and pour into quart sized mason jars (wide mouth), leaving about 1 1/2″ at the top. Let this mixture sit for about 8 hours or more.


As you can see, the mixture does separate as it sits. After this, pour the contents of each jar (do one jar at a time) into a blender and whip it up. On a personal note, I found it easier to pour all of the liquid portion into the blender and then bits of the solid (top) part in gradually. I actually added just a bit of extra water too. Eventually you will get a nice creamy texture like I noted earlier. It almost looks good enough to eat–but please don’t, unless you need to wash your mouth out!! Pour everything back into jars or another kind of container with a lid. Use 2 TB a load.

source: http://quiverfullofblessings.com/category/craftdiy-ideas/

Edited to add: I made this and added about a cup of water while I was whipping it up. I think I needed to add about 2 more cups because its a little stiff. It also didnt dissolve in my wringer washer like I had hoped it would. I am not giving up on it yet though and maybe with a few alterations I can make it more creamy.

Monday, November 1, 2010

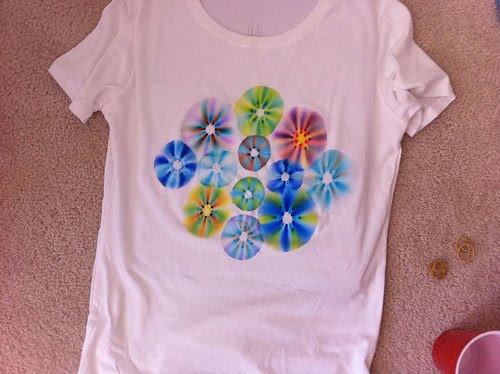
Sharpie tye dye


I found some cool craft blogs and came across this super cute idea for tye dying with sharpie markers. The tutorial is at the link below. So cool.


http://www.crapivemade.com/2010/08/sharpie-tie-dye-t-shirts.html